Orchid Care: How to Grow Phalaenopsis (Moth) Orchids Indoors
How to Often to Water Moths Orchids
| Orchids Indoors: | How Often to Water Phalaenopsis Orchids: |
| Orchids in Spring and Summer: | Water indoor potted orchids once per week during active growth. |
| Orchids in Winter: | Water once every 2 or 3 weeks in Fall and Winter. |
| Mist the Orchid Leaves: | Mist the orchids leaves and roots with water at least 2 times per week to create a humid, tropical micro-climate. |
The best water to water orchids is by watering with a generous soak with the goal of ensuring all of the orchids potting medium is evenly moist after watering. Always water your orchids at the roots rather then overhead watering to prevent crown rot.
Crown rot is a common problem associated with watering phalaenopsis orchids as as the leaves of these orchids create a funnel shape which channels water to the crown where it pools and causes rot.
Orchids grow at an angle in their natural environment so that the rainwater can drain away but indoors orchids are grown upright hence the prevalence of crown rot.
However it is important to note that in my experience, how often you water your orchids can vary according to several factors such as:
- The average humidity and temperature range of your home.
- The size of your pot or container (smaller pots dry out much quicker then larger pots, read my article, choosing the best pots for orchids).
- Whether the orchid is near sources of heat.
- The type of potting soil (moss retains more moisture then bark).
Whilst watering every 7 days in generally good advice, in my experience I find the best way to establish whether your orchid need watering is to look at the roots.
After watering the roots should be a healthy green colour, and then the roots should turn a light silver/gray as the roots and potting medium dry slightly.
Once the roots have turned silver or light gray, give the orchid a generous soak and mist the leaves and any aerial roots that are growing out of the pot.
Watering this way achieves the balance of providing the orchid with enough water to meet is requirements whilst also avoiding the problems associated with overwatering.
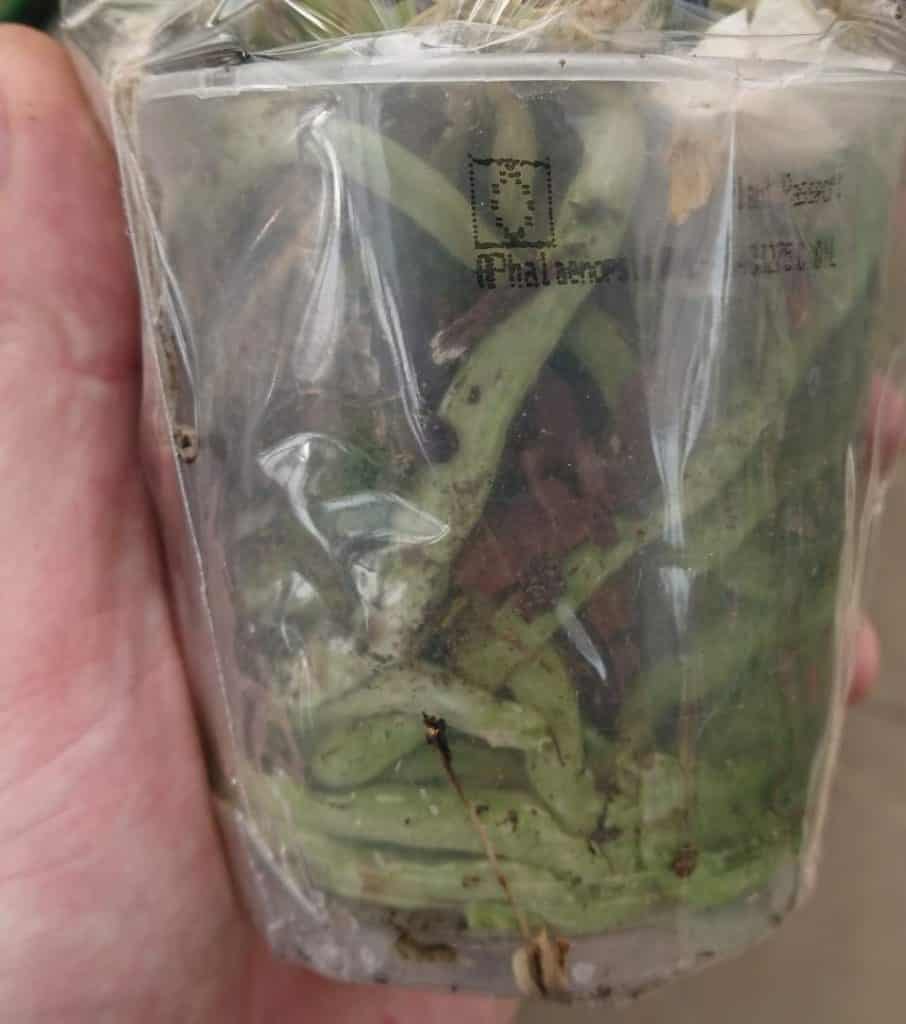
I always recommend growing orchids in clear plastic pots so you can assess the colour of the roots and determine whether the orchid needs to be watered.
I recommend always watering with lukewarm water. Phalaenopsis orchids are tropical plants and can suffer shock if the water is too hot or too cold.
I must emphasize that regularly misting is important all year round as low humidity causes the orchids buds to drop before opening. Consider how humidity changes during the year in your home, with indoor heating sapping moisture from the air in Winter and increase the regularity of your misting accordingly.
You can also use a plant humidifier which creates a humid micro climate around your orchid to keep it healthy.
If you are unsure about watering read my article, How to Tell Whether your Orchid is Under or Overwatered (With Photos).
Do not Water Orchids With Hard Tap Water
Orchids are especially sensitive the build up of minerals around the roots when they are water with mineral rich or hard tap water.
Therefore it is important to water orchids with rainwater, distilled water or bottled water, however watering occasionally with tap water is unlikely to cause an problems and generally watering with soft water is okay.
Consistently watering with hard tap water can eventually turn the orchid’s leaves yellow and prevent the roots from up-taking water and nutrients.
Therefore I recommend looking on google to establish whether your tap water is hard or soft and water accordingly.
How Often to Repot Moth Orchids
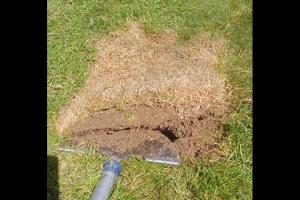
In my experience, it is best to repot phalaenopsis orchids once every 2-3 years if they are planted in a pine bark based potting medium and once every 1-2 years if they are planted in peat moss.
Pine bark decomposes more slowly then peat moss hence why the orchid should not need repotting as often.
Clear plastic pots are very helpful when it comes to assessing whether the potting medium has broken down to the extent it needs repotting.
If you do not repot your orchid the pine bark or peat moss deteriorates to a soil like consistency which reduces air circulation around the orchids roots and retains too much moisture, potentially killing the orchid.
Whether or not the potting medium needs replacing, sometimes it is necessary to repot orchids if their roots are clearly restricted and pressing up against the side of the pot.
How to Repot Phalaenopsis Orchids
It is possible to successfully repot orchids at anytime of year, but I personally recommend repotting after flowering as the stress of repotting can sometimes cause the flowers to wilt or drop off.
If the roots of the phalaenopsis are clearly pressing up against the side of the pot and clearly look constricted then ensure that the new pot is about an inch wider in diameter.
I must emphasize that orchids have aerial roots, that are there to extend out of the pot as they can would naturally in their native environment.
In their home range, the aerial roots provide additional stability, absorb moisture from the air and photosynthesize, so some roots extending out of the pot is totally normal and not necessarily cause to repot your orchid.
Sometimes it may not be necessary to replace the pot, just the potting medium (if the potting medium has decomposed).
Do not choose a pot that is much larger then 1 inch across bigger then the pot as larger pots can retain much more water then the orchid is used to which can increase the risk of rotting roots.
Larger pots with more growing medium can also cause the orchid to prioritise directing its energy into root develop rather then to grow flowers
Once you have selected your pot take the orchid out of its container and tease away any existing potting mix.
In my experience it is best to run the roots under a facet (tap) to wash away any stubborn part of the potting mix that cling on and running it under water makes the roots more flexible and easier to manipulate.
Running the roots under water should also turn the healthy roots green, however it should be noted that roots can be whitish or even yellowish and still be healthy.
The roots that are white or yellow may not have had access to sunlight which has decreased the amount of chlorophyl (which is the pigment responsible for their green color) whereas roots with access to light should be green.
Feel each root individually. The healthy roots should feel firm when you squeeze them. If they feel spongy and somewhat limp then these roots are dying and you should cut them back to healthy growth (or to the base) with a sharp pair of pruners.
Once the roots turn squidgy they do not absorb water or nutrients, therefore do not help to sustain the orchid.
This prevents them decomposing and causing problems in the new potting medium.
Some orchid roots do die from time to time as part of their natural cycle and as long as all the other roots feel firm and healthy then it does not necessarily indicate there is anything wrong with the plant.
Once you have cleaned the orchids roots, place the orchid in the new pot and fill in the pine bark potting medium around the roots.
The pine bark chips are sufficiently large in size that air can circulate around the roots and retain the moisture that phalaenopsis roots require.
The pine bark chips hold moisture and then it evaporates creating a humid micro climate around the roots emulating the orchids natural environment.
Try to ensure that there are no significantly large air pockets around the roots as too much air flow can dry the roots out.
Repotting in a transparent pot is the best way to see if the orchid has enough potting medium around the roots and that it is well distributed.
Water the newly repotted orchid with a generous soak and mist the leaves generously to help mitigate transplant shock.
How to Care for Phalaenopsis Orchids to After Blooming (And Get Them to Rebloom)
Phalaenopsis orchid blooms can last up three months in the right conditions before dropping its blooms.
The phalaenopsis can sometimes rebloom on the same flower spike if you cut the flower spike just above the second node under the spent flowers, which can stimulate a side shoot to from on the flower spike from which new flower buds emerge.
However sometimes the flower spike turns yellow and dries out, which is a normal part of the orchid’s life cycle, at which point you can carefully cut the spent flower spike back to the base with a sharp pair or pruners.
The orchid then has to grow a new flower spike before new flowers can then be displayed.
In order to stimulate the development of a new stem and new flowers the orchid has to experience a specific sequence of temperatures.
It is important to replicate the phalaenopsis orchid’s natural temperature cycle to initiate new blooms by decreasing the temperature to between 55°F (12°C) to 60°F (16°C).
The cooler temperatures indicate to the orchid that this is this is the right time of year for flower development.
Place the orchid in a cooler room for 4 weeks with bright light and some humidity, then you can return the orchid to its usual location with warmer temperatures.
This method is so effective that commercial orchid growers always control the climate conditions in order to sell orchids that are in flower at anytime of year.
In my experience, temperature is by far the most important influencing factor to get orchids to flower again.
Because of these specific temperature requirements, phalaenopsis orchids growers often struggle to get their orchids to rebloom in warm climates, whereas some growers do not have to put any effort into stimulating new flowers as their climate and household temperatures naturally follow this temperature cycle.
When growing orchid at home I find the new flower spike typically grows in Winter and the orchids flowers are displayed early Spring and last for 3 months with frequent watering, high humidity (by regularly misting the flowers, aerial roots and leaves).
(Read my article for more information how to rebloom orchids indoors).
Orchid Blooms Falling Off
Avoid any drastic fluctuations in temperature and humidity during bud development and flower displays as this can cause the buds and flowers to fall off.
Typically this means, avoiding any draughts from cold blasts of air from open doors and avoid locating orchids in the direct air current of air conditioning or heating.